Python Virtual Environments
Python applications will often use packages and modules that don’t come as part of the standard library. Applications will sometimes need a specific version of a library, because the application may require that a particular bug has been fixed or the application may be written using an obsolete version of the library’s interface.
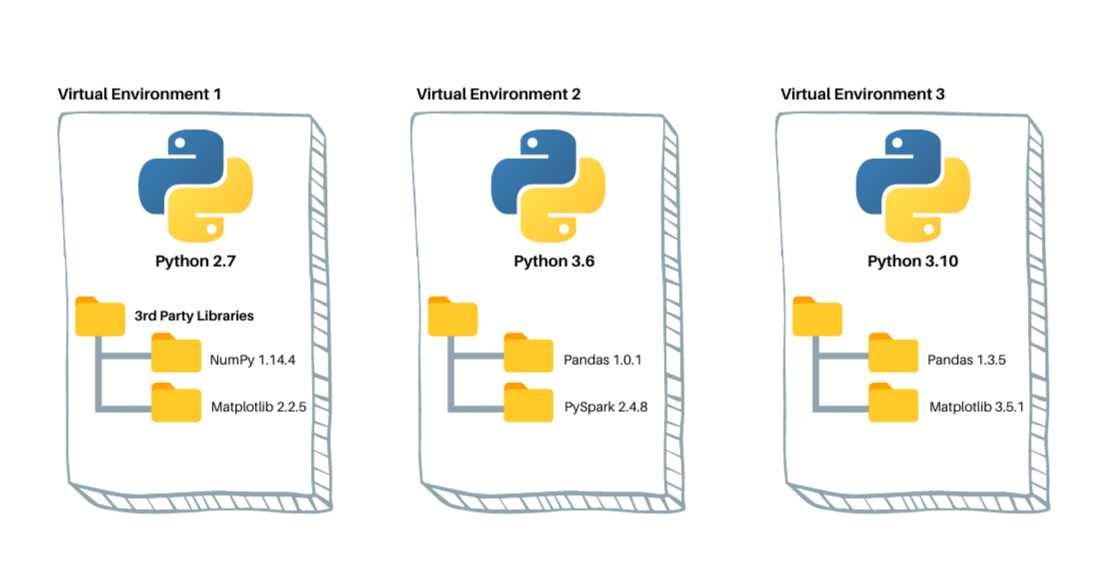
This means it may not be possible for one Python installation to meet the requirements of every application. If application A needs version 1.0 of a particular module but application B needs version 2.0, then the requirements are in conflict and installing either version 1.0 or 2.0 will leave one application unable to run.
The solution for this problem is to create a virtual environment, a self-contained directory tree that contains a Python installation for a particular version of Python, plus a number of additional packages.
Different applications can then use different virtual environments. To resolve the earlier example of conflicting requirements, application A can have its own virtual environment with version 1.0 installed while application B has another virtual environment with version 2.0. If application B requires a library be upgraded to version 3.0, this will not affect application A’s environment.
In order to use virtual environments in Linux, we need to install the following packages:
sudo apt install python3-pip python3-venvFor creating a virtual environment:-
python3 -m venv <path to directory>Activating the virtual environment:-
source <path to venv>/bin/activateDeactivating the virtual environment:-
deactivatepip
pip (also known by Python 3's alias pip3) is a package-management system written in Python and is used to install and manage software packages. The Python Software Foundation recommends using pip for installing Python applications and its dependencies during deployment.
Pip connects to an online repository of public packages, called the Python Package Index. Pip can be configured to connect to other package repositories (local or remote), provided that they comply to Python Enhancement Proposal 503.
Most distributions of Python come with pip preinstalled. Python 2.7.9 and later (on the python2 series), and Python 3.4 and later include pip by default.
In order to install a package with pip we type the following command: pip is for Windows and pip3 is for Linux
pip3 install <package name>Besides the default PyPI repository, Pip supports custom repositories as well.[16] Such repositories can be located on an HTTP(s) URL or on a file system location.
A custom repository can be specified using the -i or—index-url option, like so:
pip3 install -i https://your-custom-repo/simple <package name>or with a filesystem:
pip3 install -i /path/to/your/custom-repo/simple <package name>To uninstall packages in pip we type the following:
pip3 uninstall
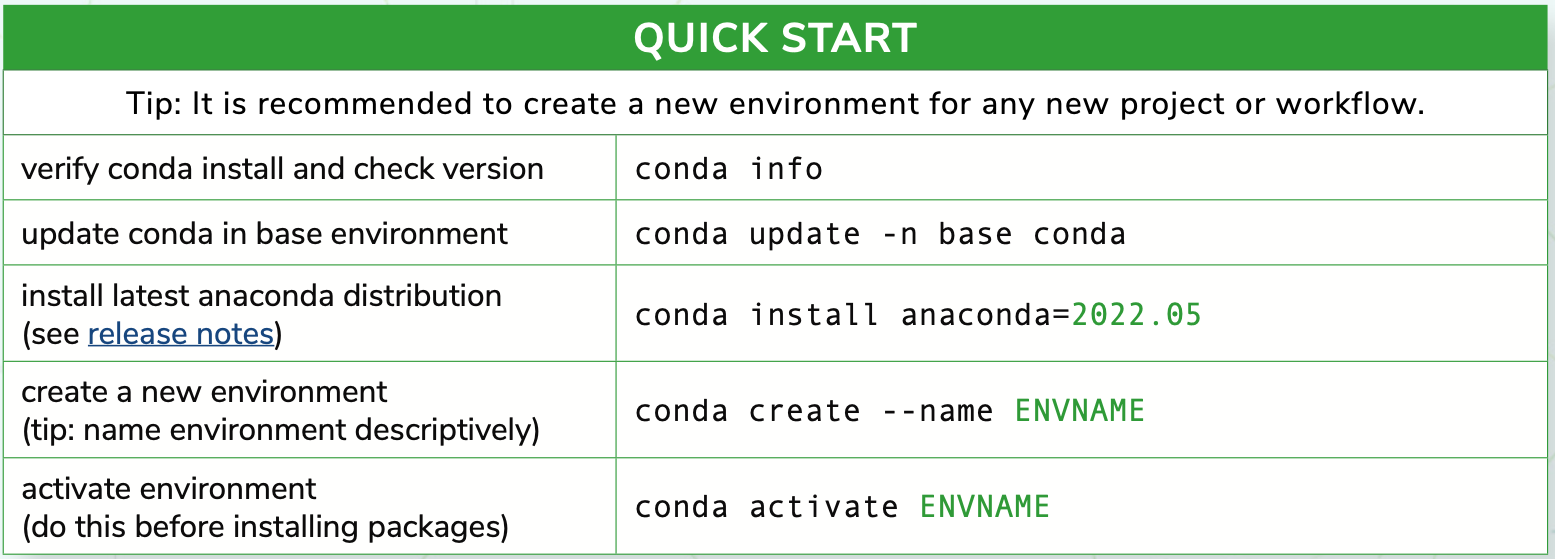
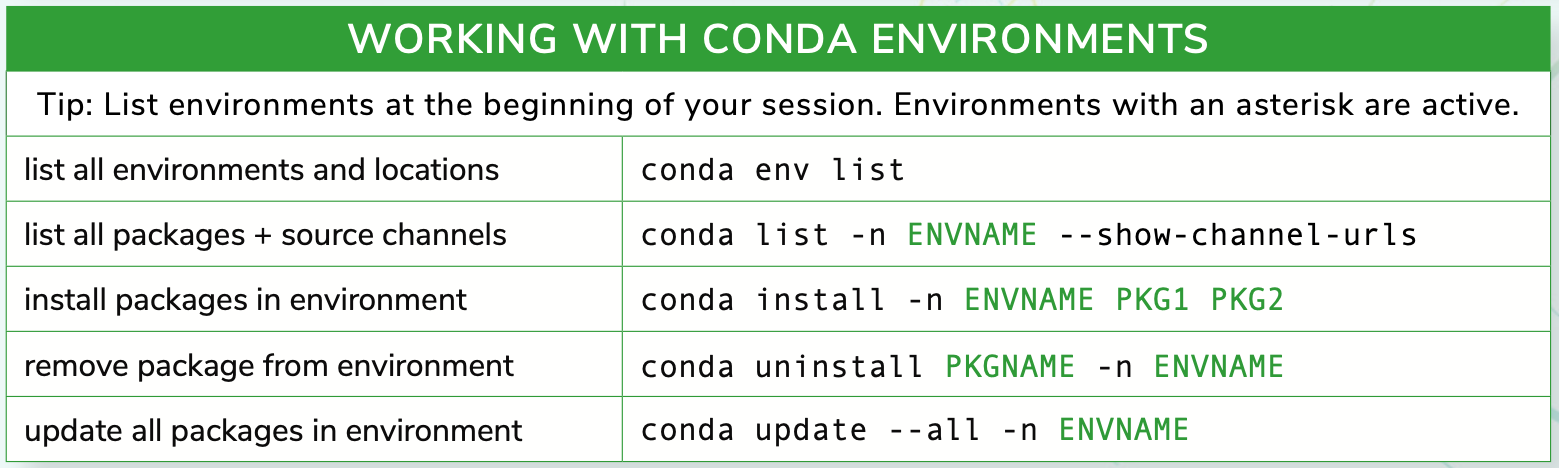
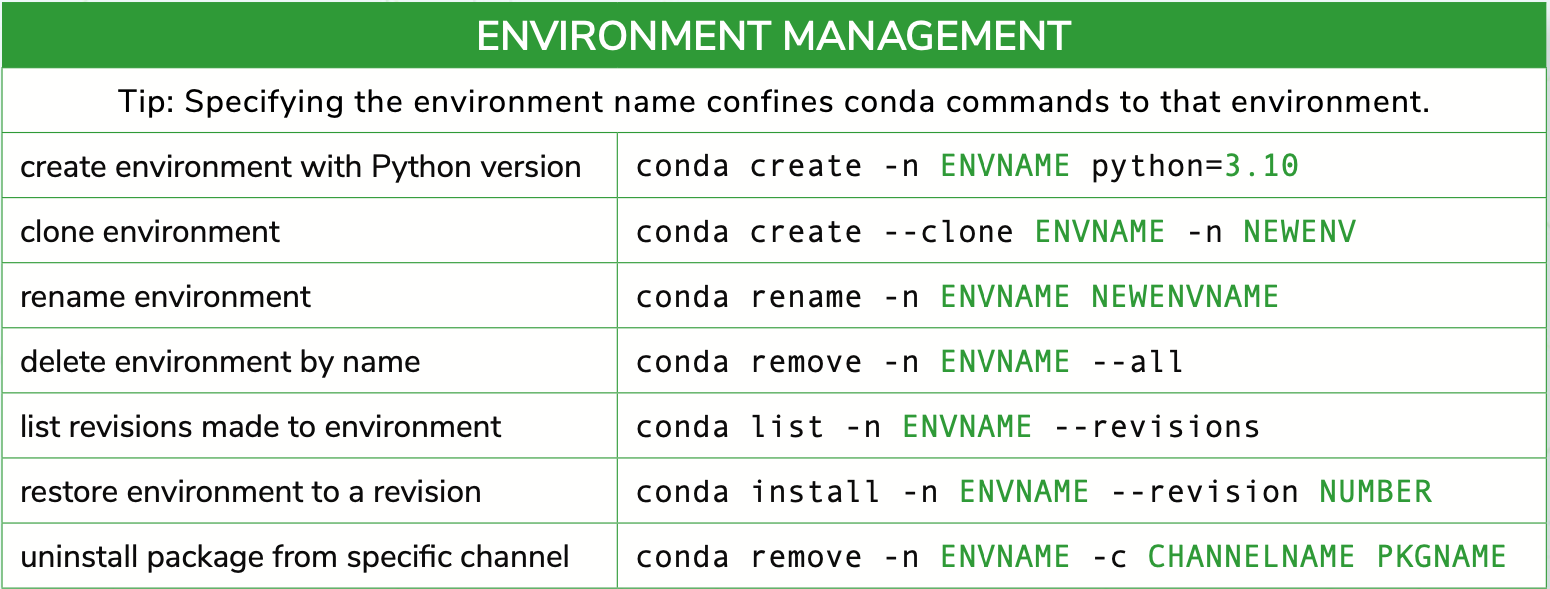
Conda is an open source package management system and environment management system that runs on Windows, macOS, and Linux. Conda quickly installs, runs and updates packages and their dependencies. Conda easily creates, saves, loads and switches between environments on your local computer. It was created for Python programs, but it can package and distribute software for any language.
Conda as a package manager helps you find and install packages. If you need a package that requires a different version of Python, you do not need to switch to a different environment manager, because conda is also an environment manager. With just a few commands, you can set up a totally separate environment to run that different version of Python, while continuing to run your usual version of Python in your normal environment.
Conda can be combined with continuous integration systems such as Travis CI and AppVeyor to provide frequent, automated testing of your code. The conda package and environment manager is included in all versions of Anaconda and Miniconda.
Package, dependency and environment management for any language—Python, R, Ruby, Lua, Scala, Java, JavaScript, C/ C++, Fortran, and more.
You can install conda from any one of these link:
Miniconda (Light Weight): https://docs.conda.io/en/latest/miniconda.html
Anaconda (Heavy): https://www.anaconda.com/download/
Jupyter Notebook
The Jupyter Notebook App is a server-client application that allows editing and running notebook documents via a web browser. The Jupyter Notebook App can be executed on a local desktop requiring no internet access (as described in this document) or can be installed on a remote server and accessed through the internet.
In addition to displaying/editing/running notebook documents, the Jupyter Notebook App has a “Dashboard” (Notebook Dashboard), a “control panel” showing local files and allowing to open notebook documents or shutting down their kernels.
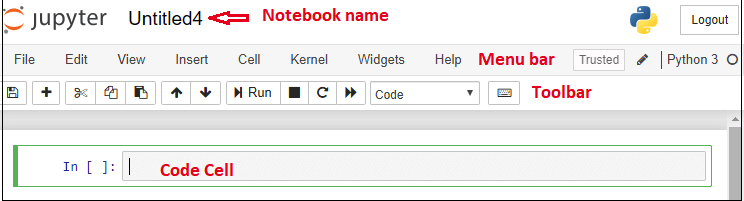
Components of a notebook
A Jupyter Notebook consists of three main components: cells, a runtime environment, and a file system.
Cells are the individual units of the notebook, and they can contain either text or code:
- Text cells are used to write narrative text and include images, links, and equations.
- Text cells are written in Markdown, a simple markup language.
- Code cells are used to write and execute code.
- The output from code cells will be displayed directly below the code cell.
- SQL cells (Workspace only) are used to execute SQL queries, which means you can easily retrieve data from a database.
- Chart cells (Workspace only) can be used to create visualizations and quickly visualize Pandas dataframes.
The runtime environment is responsible for executing the code in the notebook. The runtime environment can be configured to support different languages, including Python, R or SQL.
The filesystem allows you to upload, store, and download data files, code files, and outputs from your analysis.
kernel
A notebook kernel is a “computational engine” that executes the code contained in a Notebook document. The ipython kernel, referenced in this guide, executes python code. Kernels for many other languages exist (official kernels).
When you open a Notebook document, the associated kernel is automatically launched. When the notebook is executed (either cell-by-cell or with menu Cell -> Run All), the kernel performs the computation and produces the results. Depending on the type of computations, the kernel may consume significant CPU and RAM. Note that the RAM is not released until the kernel is shut-down.
JupyterLab
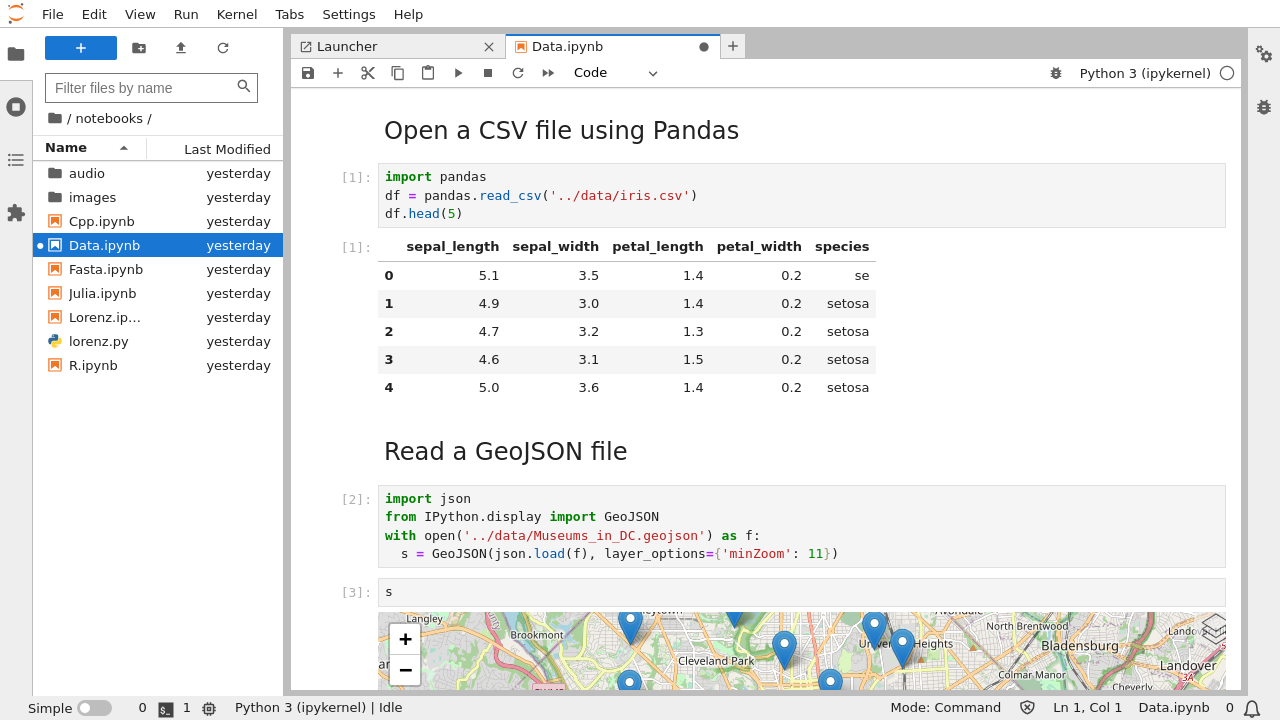
JupyterLab is an interactive development environment for working with notebooks, code and data. Most importantly, JupyterLab has full support for Jupyter notebooks. Additionally, JupyterLab enables you to use text editors, terminals, data file viewers, and other custom components side by side with notebooks in a tabbed work area.
JupyterLab provides a high level of integration between notebooks, documents, and activities:
- Drag-and-drop to reorder notebook cells and copy them between notebooks.
- Run code blocks interactively from text files (.py, .R, .md, .tex, etc.).
- Link a code console to a notebook kernel to explore code interactively without cluttering up the notebook with temporary scratch work.
- Edit popular file formats with live preview, such as Markdown, JSON, CSV, Vega, VegaLite, and more.
JupyterLab is built on top of an extension system that enables you to customize and enhance JupyterLab by installing additional extensions. In fact, the builtin functionality of JupyterLab itself (notebooks, terminals, file browser, menu system, etc.) is provided by a set of core extensions.
Among other things, extensions can:
- Provide new themes, file editors and viewers, or renderers for rich outputs in notebooks;
- Add menu items, keyboard shortcuts, or advanced settings options;
- Provide an API for other extensions to use.
#Create a virtual environment
mkdir data-science
python3 -m venv data-science

#Activate the environment
source data-science/bin/activate
cd data-science

#Install Jupyterlab via pip
pip3 install wheel jupyterlab

#Run jupyterlab
jupyter-lab
Then create a jupyter notebook and start coding.
#Create a virtual environment
conda create --prefix data-science

#Activate the virtual environment
conda activate $HOME/data-science
cd data-science

#Install Jupyterlab
conda install -c conda-forge jupyterlab

#Run Jupyterlab
jupyter-lab
Then create a jupyter notebook and start coding.